My (bitchy) aroid mix

Through the years, I have experimented with a wide range of soil ingredients- from loam soil, sand, coco chunks, coco peat, burnt rice hulls... practically everything you can think of. And while these components can be suitable for most plants, the mix just won't cut it for more specialized aroids. Everyone have their own recipes that they swear their lives on. However, I have found out- through trial and error as well as years of experience- that my 'tried and tested' mixes even from just a few years ago have resulted in the demise of some choice plants. Plants that are extremely difficult to procure here in the Philippines where horticulture is not as well-developed as its neighbors. I needed a mix that would greatly minimize, if not eliminate, the odds of losing more plants. Incidentally, what I have come up with is very similar to those used by aroid growers in Europe. And by 'aroid growers', I am not referring to the mainstream crowds who like what their next door neighbors have. I am talking about the aroid people who grow those prima donna plants that most cannot. Or would not.
The materials you see above are red scoria (#5 and #10 sizes), pumice, and peat. I know, I know. Peat is not a renewable source but in my high temperature, high humidity conditions, the so-called coco peat disintegrates rapidly in just a matter of a few months, which necessitates more frequent repottings with fresh media. Peat lasts much longer. Between scoria and peat are larger blocks of pumice which I pick off to be used below the pot to facilitate drainage. I do not concern myself with proportions, relying instead on 'feel'. I think that gardeners ought to hone their intuition instead of being shackled by numbers.
So why these three? Scoria is lightweight and studded with larger vesicles compared to pumice. Used as a soil component, it enhances aeration around the roots, which is particularly important for the so-called 'rot prone plants'. Those plants rot at the roots not because of excessive water, but because the soil being used for them is too dense. However, I find scoria to be too permeable, and can dry out the roots very quickly in warm weather. Pumice is in many ways like scoria but it retains water better, apart from also contributing to soil aeration and sharp drainage. Peat acts like a sponge and tends to hold not just water, but fertilizer nutrients as well. You don't want your fertilizer to drain off just as you apply it. I always keep peat lesser in volume than the rocks.


Offset of Amorphophallus taurostigma potted in the new medium. I always top-dress the soil with balanced formula time-release fertilizers with trace elements. I really would not recommend sprinkling this set-up with manure because that would defeat the idea of having a sterile medium.


All the ingredients are mixed by hand. I like the feel of the earth as well as the earthy taste I get when I eat with my bare hands 😂

An important prerequisite in the preparation of the mix is sterilization, which is accomplished by torching it for about 5 minutes. Be aware that rocks can expand and tiny bits thrown off randomly, which is why some baffle or eye protection is a good idea when doing this. Let the mix cool off, do some Tiktok, and you're ready to go.


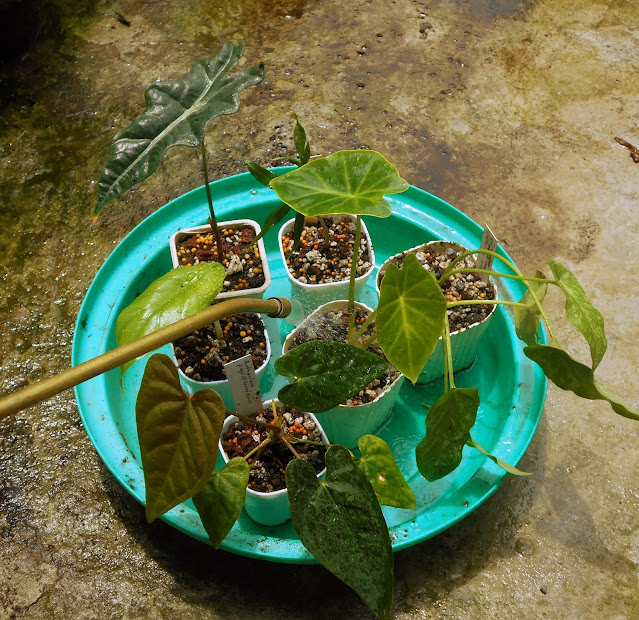
Bulbil propagation of Alocasia clypeolata x A. ramosii (?). The bulbil is still visible here (that brown lump just above my thumb). Alocasia bulbil propagules should be repotted as soon as the first leaf emerges because the development is quite fast from this point on, and you would not want to wait much longer or you'll mess up with the already well-developed roots.

A good washing down with an inoculant is the final step. You're looking at propagations of Alocasia sanderiana, Amorphophallus taurostigma, Typhonium flagelliforme, Remusatia vivipara, Anthurium papillilaminum, and Alocasia clypeolata x A. ramosii (?). I have since stopped using fungicides and resorted instead to the introduction of beneficial soil biota both to combat soil-borne pathogens and for the plants' over-all health. The soil mix detailed here is what I have been using for more root-sensitive aroids (bitches that go by the names of Alocasia and Amorphophallus), as well as terrestrials that benefit from loose soils and plants that require a lot of water without risking base rot. Many people believe that too much water kills plants. False. It's soil that do not permit aeration that gives you those sorry empty pots. You can, of course, experiment and use other materials as well depending on your budget and ingredient availability, for as long as you don't stray far from the same idea.
Disclaimer: I am in no way espousing this mix to be the best that I have ever come up with, and it may prove to be unsuitable in conditions different from mine. I may even chuck everything out and try something entirely new sometime in the foreseeable future. Knowledge evolves, no matter how long you have been doing the same things again and again. So be leery of folks, particularly the beginners, who love to pretend as if they have figured all things out- after having their first plant just three months ago.
'kay, I'm outta here.


Hi there, I just wanted to say thank you so much for your blog, most of the information online is just regurgitated basic care info, so it’s awesome to find someone who has real experience.
ReplyDeleteI recently purchased an alocasia sinuata, which are very expensive here so I was to keep it in best shape. I read your post on the natural habitat, and along with this post this is what I’m thinking for it:
A layer of course pumice for drainage in a terracotta pot, followed by a mix of pumice, scoria and coco peat (or pine bark?), since we don’t have peat moss available here. On top I was thinking of placing a layer of New Zealand fern fibre, to represent the forest floor leaf litter, and to slowly release water, and maybe a little spaghnum moss if it’s drying out too quick.
This mix is completely devoid of nutrients, which makes sense given in the wild the plant would get its nutrients from the cave drippings, along with a lot of calcium carbonate (this is all speculation, but I feel as though the cave run off would contain a lot of minerals as it washes through). I’m nervous though, as I have very little experience with fertiliser and just follow the instructions on the bottle usually, but I want this plant to be in optimum conditions and so it calls for a more thorough approach. Theoretically the ideal situation would be an IV bag of lightly fertilised, alkaline rainwater that constantly drips in if I’m not mistaken, so that’s my thought process behind the following.
For context, my plant will be in bright indirect light (grow light), with 80-100% humidity and 20-30 degrees C temp in my plant cabinet.
Would it be of value to add a highly diluted (let’s say the normal requirement is 1:1000, I instead do 1:5000) liquid fertiliser to every water, and put the plant in extremely fast draining conditions and then water almost daily? Could I sprinkle some worm castings on top of the pot, to represent the decaying leaf litter, or would this roll the dice with rot? Would there be a benefit to adding horticultural charcoal to sequester the fertiliser and then slowly release it? Should I add some lime, to represent the limestone conditions? Would you estimate the plant would prefer slightly alkaline conditions, based on where it grows in the wild?
I know fertiliser isn’t the plant’s food, but I really like the idea of best recreating it’s home, for a happy and healthy plant. I have very little experience with fertiliser though, so I would really love to pick your brain here! Thank you for reading this long question, and I really appreciate any help you can offer :)
Oh I will also add, because I would hate for you to think I am perpetuating everything environmentally-unfriendly about hobby growing… the charcoal is homemade from pruning, the tree fern is made from a ponga log my friend was going to burn, the sphagnum moss is (supposedly, at least) ethically sourced here in New Zealand, and we’re not allowed importing plants at all due to strict biodiversity control, so the plant is more certainly not poached.
DeleteHi Cailin! Love it when people are able to synthesize information and come up with reasonably good interpretations ;-) From what I remember of Alocasia sinuata in the wild, there's a pretty dense layer of decaying organic matter around the roots; one would be surprised how long the petioles actually are once the debris have been cleared off. From what I understand, limestone is quite acidic as it degrades. Coupled with the accumulating debris and humus, I reckon that the conditions around the roots are not at all alkaline. I do not think lime would be necessary, though it certainly wouldn't hurt. However, and this is for the benefit of those who are also reading this, caution must be mentioned against the use of other substitutes such as marble chips. Marble is unstable pH-wise, and the swings may harm the plant in just a matter of weeks. Anyway, your lighting and temperatures are spot on. The habitat is more breezy than stuffy, so humidity levels of about 70% should be fine. As for the ferts... you may not believe this, but I do apply fertilizers almost everyday (5-6x a week). Half a teaspoon of Peter's balanced formula for every 2 gallons of non-chlorinated water (our tap water is slightly acidic, btw), and laced with a quarter of a teaspoon of urea. Not to mention the addition of time-release pellets (17-8-9) with trace elements. Flushing is done roughly every three weeks.
DeleteSome final words: keep watering to a minimum during the first few weeks after acquisition, and never, ever water it from above where water can collect on the leaf axils. The small, lithophytic alocasias are notoriously prone to rotting when they have been disturbed/repotted/taken to a new location. Heck, they might even turn to mush the minute you look at them funny. It's past the prima donna stage once you see roots meandering atop the medium or squirming above the pot's drainage holes. Hope that helps and seriously hoping here that your plant will thrive for you!
The Aroid Mix is a stunning collection of diverse and vibrant plants.
ReplyDelete